Monday, July 30, 2012

Washers/Dryers

So we've now had our new washer/dryer for nearly a month and...so far so good!

Looking for a new set, all the stores were really pushing the front load washer/dryer sets (which of course, are almost all over $2000 for the set!!). After reading many reviews on Amazon, we subscribed to Consumer Reports online (only $30 a year for access to all their reviews) thinking that finally we'd have some objective marks. 

And in some respects they did help quite a bit. They address issues such as water usage, noise and vibration, cleaning ability and roughness on clothes.  However, the one item they don't really get into, which for me was the most important, was reliability!  Thankfully they have a user review section which we read with great interest after we kept seeing front-load washers getting near perfect marks from CR, but <1 star from owners!

It seems that the constant issue with the front-loaders is that the drum bearings break down. And not soon after buying, but just over a year with normal use....right after the warranty expires. I couldn't count the number of reviewers who found this out the hard way, and when they had a repairman come out to service the washer, found out that replacing these bearings cost nearly as much as a new washer!!

So top loaders it was!  The sets that we had our eyes on were some of the top-rated washers on Consumer Reports list, but surprisingly not the most expensive by any means.  We were looking at the Samsung WA5451ANW and DV5451AGW, and the LG WT4801CW and DLG4802W. One would think they could come up with some better model names for these...like the Clean-enator or Tsunami or (for fans of the Transformers) the De-Septic-Con! 


We started tracking prices using our favorite price watching site, Camelcamelcamel.com, well actually her sister site CamelBuy.com.  If you've never used these sites, they are FANTASTIC!  You can load your Amazon wish list or just search for products and then track them. You set your goal price and wait.  When Amazon has one of their random price changes to your goal price, you get an email!  CamelBuy is the same, but for BestBuy products.


How can a washer be $599 one day and $749 the next?!
Add caption

And thank goodness we did track prices, because appliance pricing is completely arbitrary.  If you look back at six months of pricing for most appliances, there will be several hundred dollars worth of variation. For the LG washer we got, prices ranged from $599 (which we got!) up to $749, and the LG dryer from $569 to $849!  No rhyme or reason at all. But we got them for nearly the lowest prices and with free delivery and installation from Best Buy! Not too shabby.

Friday, July 27, 2012

SD Energy Challenge

This is a site I've already shared with mom, but thought it was novel enough that I should post about it.

San Diego Gas and Electric (SDGE) has an energy saving challenge this summer, but they're doing it in a very unique and tech-saavy manner.  The website is sdenergychallenge.com.  The objective is to earn points by reducing the amount of electricity you use to win monetary prizes for your local middle school as well as potentially for yourself (an iPad!!).  The school prizes are dependant on how many people sign up relative to the enrollment of the school. But the individual prizes are dependant on how many days you are in the lowest 25% regarding overal electricity usage. You can also earn bonuses off your actual bill by reducing your usage during the day on certain "reduce your use" days during which they expect above average usage ($0.75 for each day which isn't bad).

How do they monitor your daily usage, you ask?  SDGE has now switched to remotely read meters that transmit usage information on an hourly basis.  These leads to some very cool graphing options.
Here's our usage over the last day by hour.

Never realized the TV/Xbox (we were watching on Netflix) used that much energy! (the spike at 7pm).  I think this is great; maybe people doing this challenge will be inspired to not watch TV or use the computer as much. I've definitely thought about energy use more over the last few weeks we've been doing this.

So far there are 52 people signed up for our middle school, Taft (which is 10% of the student body and puts us in 8th place out of 33).  But individually, we are not doing so great; 40th out of the 52 for our school.  I guess maybe it's a selection bias, the people who are doing this challenge are already the energy-conscious so we're not competing against the heavy users. Or maybe this includes people who have solar panels! 

Guess i'd better go to the library to get some books for us to read instead of watching TV tonight!

Thursday, July 26, 2012

No need to get catty!

Here I am, planning all the fun stuff for us humans, sinks and blinds and patio furniture, etc. and not one post about the cat. Well Muji reminded me yesterday that since we had taken down her cat-shelves at the old apartment, she really doesn't have a good view of all the birds outside and no place to sun! (isn't she just too cute?)

So yesterday evening I began our search anew for a good cat-tree or other furniture ideas to give Muji a nice perch from which to watch the world go round.  There's so much cat furniture out there, but the majority of it is so, for lack of a better word, ugly.

Enter Moderncat.net.

This blog/all-things-cat website is fantastic.  They manage to find cat furniture and other products that aren't carpet-covered monstrosities and actually manage to increase the aesthetics of your house.  And if you can't shell out the cash (some of these pieces are quite pricey), they have a whole DIY section on how to catify your house.  Fantastic!

Some of our favorite pieces so far we've found through Moderncat:

1. Whiskerstudio.com's "Elevation" Modular Cat tree (left) - This is kind of DIY. You can buy the Stolmen Pole and clamps from Ikea and simply buy the shelves from Whiskerstudio.  The pole can go up to 12 feet tall or you can attach to to the walls via the shelves themselves if your ceiling is higher.  What an awesome idea.  A modified version of this was recently used on the Animal Planet show My Cat from Hell.

2. The Sebastian Modern Cat Tree (right) - This one is also quite elegant, and you could use parts of it as a bookshelf as well as a cat-tree (better pics on the site).  But at $268, still a bit much.

3. Royal Woods Cat Scratchers (below) - Now this is the one I really want.  It's made from Liana wood (a rather ambiguous term referring to woody vines).  The wood is absolutely gorgeous (unclear if they did any finishing) and would almost be a work of art on its own!  The only problem is that they are based in the Netherlands and the nicer models are in the 400-500 euro range! But there's free shipping if you live in the Netherlands...shucks.  I tried to find out what type of wood they used in particular and was searching for any companies that might sell Liana wood here, but no luck.  Wouldn't this be a fun home project!


Oh well.  Muji might have to wait for some of these....

Addendum -
Camila just referred me to an Etsy listing by Franklin Cat Furniture.  It's quite similar to the WhiskerStudio Elevation tower above, but they have nice bright carpeting on the steps as well as some other neat cat-ification ideas.

Wednesday, July 25, 2012

Laundry sink

Our next potential project for the house is a new laundry sink.  Not one that we install ourselves, we'll leave this one to the professionals (although I would get to buy lots of new toys if I did it myself!!)

But I guess we do get to pick out what type of laundry sink we would like. 

I kind of like the vintage sinks that Kohler makes, like the Kohler Sudbury Service Utility Sink (right). But oh gosh, they start in the $400s!  Maybe we'll go with the much more practical Swanstone Free-standing Polypropylene sink, only $40. But oh so bland and boring (although I guess it is just for the garage isn't it!).

I'm sure there have to be more elegant options other than these two extremes. Any ideas?


Ooohh! I just came across these stainless steel sinks on Mission Restaurant Supply. Not too shabby, and at $232 for a stainless steel free-standing sink, relatively reasonable.

Tuesday, July 24, 2012

Every now and then there's a rough patch...

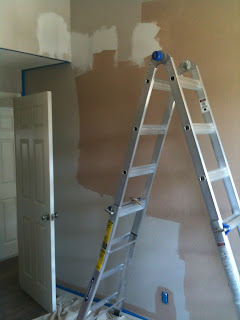
the first patch job got the best knockdown resultsWe love our little multipurpose ladder! So here are the before pictures of the two walls we decided to repaint.  As you can tell, there were quite a few holes from the installment of the new grounded circuit last month. It's tough when you don't have an attic or basement!

The patch jobs ended up looking...okay.
I've found that the knockdown texture is a difficult skill to master, particularly using the aerosol cans and doing small areas.  The first patch I did was actually the best looking patch because the knockdown spray was coming out very consistently at that point in the can.  The upper ones were a little thick, and the ones in the study were just a mess.  I'm still thinking about going back at some point and re-texturing, but mandy wanted to start actually living in these rooms so I'll have to postpone that idea.

Either way, the actual painting was rather fun (even muji wanted a part of it!).

We made some mistakes, but I think overall it looks quite nice.  We'll have to post some pictures when it's ready.  In the meantime, here's a picture of the wall mid-paint, and the new fashion from San Diego, painter's blue as worn by Mandy.

muji hunting for paint drops under the drop clothmid-painting on the second bedroom, the color is quite nice! taking down the painter's tape was obviously the most enjoyable part

Monday, July 23, 2012

What a drip!

Although it's now nearly a month ago, I thought I'd share a little learning I received the first time we ran our dishwasher.  We had been watching the kitchen sink plumbing as previously there had been a tiny leak from the smaller half (nothing that a little turn of the wrench couldn't fix), but hadn't yet used the dishwasher. Thankfully we were watching, because as soon as the dishwasher began draining, there was a stream of water running down the dishwasher drain line from near the air gap. Having no idea how a  dishwaser drain is hooked up, I did a little research online to see if it was something I could fix myself, and learnes some interesting things along the way.


First things first, this is the proper drain set-up for a modern dishwasher.  The drain from the dishwasher is brought up to the air-gap before connecting to the waste disposal (if one is present).

So what the heck is an air-gap, and what does it do? 

It's the funny little chrome thing on the sink next to the faucet that you never knew what the heck it was.  The air-gap is a basically a mechanism to make sure dirty water does not get flushed back into the "clean" dishwasher system.  This is useful in case there is a sewage back-up in the drain system further on down the line. 


The old style of preventing back-ups into the dishwasher was by a system called a "high-rise loop" (left).   This system just involved elevating the returning dishwasher drain line above the kitchen sink drain.  However, this just increases the pressure needed to back the system up and doesn't eliminate the possibility of contamination.

The air-gap (below) involves a high-rise loop, but inserts an actual "air gap" into the system.  This way, if the main line were to back up into the dishwasher system it would reach the air-gap and spill out into the sink rather than going further into the "clean" dishwasher system. (Although sewage water in the sink is pretty darn gross too!)

Of course, thankfully all the problem was was just readjusting the clips and tightening the connection between the drain line and air-gap mechanism, but now you learned something!


Coffee-table pictures

Well I uploaded the pictures this morning so here they are.

I wish I had taken a pre-refinishing picture (duh!) but the mood to refinish struck me so suddenly that I was already halfway through sanding when I thought of it.


The second picture is after the second coat of stain.  It looks like a nice color here, but was really quite noticeably lighter.  I haven't taken a finished photo yet as I was so frustrated after the botched finish. Maybe I'll just choose to remember the second photo alone.  Even there you can still see some water rings (man, those things are nearly impossible to get rid of!).